Chive Blossoms

Chive blossoms are more than just a pretty decoration at the end of an oniony stalk. These delicate purple blooms are edible. Pick whole blossoms by pulling gently at the base of the flower to pop off the entire bloom. Give them a quick rinse and dry on a paper towel or drying rack. You can even use a salad spinner.

20140611-233002-84602414.jpg

After most of the bloom is dry (don’t worry about every drop of water evaporating), grasp the stem end in one hand and pluck out the tiny blossoms with the other. These individual blooms will pull out several at a time.

20140611-233058-84658661.jpg

My favorite way to use chive blossoms is stir into mashed potatoes just after mashing. The blooms add a faint chive flavor plus a splash of color.

Another option is to include a handful in each layer of au gratin potatoes. The color stands out against the creamy white sauce and golden yellow cheese.

Salads are an additional tasty place to use these blooms. Sprinkle a few across the top of a green lettuce salad for an unusual color addition.

This year, the blooms are abundant and I experimented with freezing the blooms for later use. After washing and drying, pull apart the blooms. Spread in a single layer on a parchment lined cookie sheet and freeze for several hours or overnight. Pack in crush proof containers or freezer bags. After a week in the freezer, I tested some by sprinkling over grilled cheesy potatoes. Just like fresh picked. I expect to use these throughout the winter.

20140611-233210-84730009.jpg

20140611-233256-84776534.jpg

To make grilled potatoes:

Slice four to five medium potatoes onto a large sheet of heavy duty foil. Drizzle one tablespoon of olive oil over the potatoes. Salt and pepper to taste. Fold over the foil to seal tightly. Place over hot coals on charcoal grill turning occasionally for about 20 minutes. Remove from grill, open the packet and sprinkle with a half cup of shredded cheese and a handful of fresh or frozen chive blossoms. Close the packet for three to four minutes or until the cheese has melted.

20140611-233421-84861144.jpg

Thank you for your interest in Five Feline Farm. While you’re here on the website, if there is anything you need from Amazon.com, please link through one of the books on the left. You do not need to order the book, but anything you do buy will give us a small referral fee.

And try some chive blossoms….

It’s Asparagus Time!

Don’t get caught eating slime.

Fresh asparagus is nothing like slimy canned stuff. Not that I’ve ever decided to try the slimy canned stuff. It just never appealed. But fresh, oh my. And to pick a handful, walk straight to the kitchen and have it on the table in under 30 minutes. Well, it just doesn’t get much fresher than that. One of my absolute favorite things is to pick something fresh and go straight to preparation then table. Ok, I know everyone can’t do that, but the next best thing is to buy from a farmer’s market.

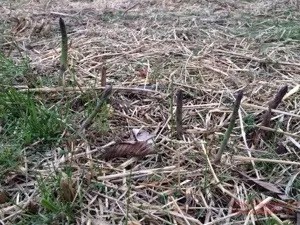
Oh, but asparagus picked from your own patch. This delicious vegetable is one of the first in the spring to poke through the ground. It will provide a plethora of delicious meals.

Asparagus is a perennial vegetable that is planted in a row from root crowns. It does take awhile to establish a new asparagus bed. Although this is a bonus in years 3-25, it is a slow wait until your asparagus starts producing.

Buy root crowns from a reputable source. Asparagus comes in male and female although both are not required to produce. The female varieties produce a thinner stalk while the male produces a thicker stalk. Both are delicious and it is a personal preference which style you like.

To plant asparagus, dig a trench 6 inches deep, approximately 12 inches wide and layer in compost down the middle of the trench. Spread the root crowns across this mound of compost and cover with 2 inches of soil. After a couple of weeks, cover with another 2 inches of soil and repeat until the bed is slightly mounded.

20140424-063743.jpg

Then the wait begins. You will not harvest the first two years from this bed so the plants can invest all of their energy into root systems. The third year you may harvest lightly and after the fourth year you can harvest as needed. Shoots will come up quickly. Monitor frequently through the early spring.

To harvest, cut the spears near ground level or bend gently until it snaps off. We use the bend and snap method.

What to do with that harvest? Try grilled or oven roasted spears. Drizzle spears with olive oil, salt and pepper to taste. To grill, place directly on the grill grates, turning frequently until lightly charred but still crisp-tender. When you aren’t grilling, you can roast in 425 oven, Use a shallow pan, toss with the olive oil, salt and pepper, then roast for 15 to 20 minutes, turning once.

If neither of those methods suit you, fresh asparagus is excellent in a quiche, sautéed with scrambled eggs or lightly steamed with a rich hollandaise.

Drop us a comment about your favorite spring vegetable and how you like it prepared.

Eat Healthy

What can you do to eat just a little bit healthier?

First, buy local whenever possible.

The farmer’s markets will begin soon. Just a bit of planning can have you looking for those growers in your area. Be cautious though. Some farmer’s markets have vendors that truck in vegetables from miles away. Although these people need to make a living too, this is not much different than buying your food at a national grocery store.

Next, learn what vegetables are in season.

When you eat seasonal foods, you do a couple of things for yourself. One is save money. Foods are abundant when they are in season, so the cost is lower. Seasonal plus local equals higher quality. The food has less time between farm and table so it retains more nutrients.

Grow your own.

Ok, everyone can’t grow their own vegetables due to space or time constraints. But maybe you can join in with a friend who has a garden. Check to see if there is a community garden plot available. If those are not options everyone surely has room for a pot of basil or chives on the window sill. Fresh herbs make everything taste better.

At Five Feline Farm we are striving to grow as much of our own food as possible. Keep checking back for updates on what is in season. You may even see a suggestion or two on how to use these garden goodies.

20140410-063520.jpg

Three Sisters

Five Feline Farm is planning a garden area on the south end of the property to showcase new crops as well as heritage varieties of familiar crops. In time, a garden shed, marked pathways and dedicated plant beds will be added. Visitors can expect to see this area expand and develop over the next two to three years. Each new variety will be planted in the most sustainable method available.

The central feature for 2014 will be a Three Sisters companion planting. You may recall this referred to in the last post. Three Sisters is an ancient method of companion planting corn, beans and squash. Some accounts or legends associated withThree Sisters suggest this is the method that was taught to the English settlers by the Native Americans. Each plant benefits the other. The products harvested then support a balanced diet for the gardener.

Varieties for the Three Sisters area at Five Feline Farm have been sourced from Native Seeds. Each reflects an ancient culture and are open pollinated.

Three Sisters begins with corn. The sturdy stalks provide a natural pole for the beans to climb. We will use two varieties of corn: Hopi Greasy Head and Mayo Tuxpeño. Both of these are “dent” corns to be dried and ground into cornmeal.

Pole beans are the second sister of the trio. Beans collect nitrogen from the air and impart it to the soil. Nitrogen is a critical nutrient for healthy corn development. In keeping with the Native American theme, Hopi Black Pinto beans are the variety of choice for this planting at the Farm. These beans can be picked and eaten green but also allowed to ripen and dry for long term storage.

The final sister in the planting is squash. We will be using Yellow Crookneck. The large leaves of squash vines shade the ground under the group acting as living mulch to conserve moisture and block weeds.

The Three Sisters are planted in a slight mound with a flattened top. The mound is approximately one foot high and four feet or so in diameter. Corn is started first and allowed to grow to about twelve inches before the beans are started. One week after beans, squash is planted.

20140120-113050.jpg

Meanwhile as we dream of weather warm enough to start Three Sisters, early seed starting is beginning in the basement. Marigolds, heirloom tomatoes ranging from Cherokee Purple to Roma, peppers, tobacco and herbs will be poking through the germinating mix soon.

20140120-112909.jpg

As you can see, planning for the growing season, dreaming of warmer weather and starting the garden plants indoors is how we address the winter doldrums here at Five Feline Farm. Post a comment to let us know how you are coping with the cold winter.

Don’t forget to watch the website for an opportunity to sign up for our newsletter for exclusive subscriber content about life at Five Feline Farm. Target release date is January 31, 2014.